
What’s the Best Way to Apply Linseed Oil for a Durable Finish?
You want that classic, hand-rubbed linseed oil look, but you also need a finish that actually protects wood for years. I see many woodworkers struggle with gummy results or weak protection from poorly applied oil.
I will guide you through the methods that work, explaining why they do from a materials perspective. We will cover critical surface preparation, the trade-offs between rag, brush, and hand application, managing the curing process for hardness, and why polymerized linseed oil changes the game.
My recommendations are forged from my own shop trials and a materials science approach to every finish I use.
The Linseed Oil Mechanism: How It Sinks In and Cures
Think of wood under a microscope. It’s a maze of tiny hollow tubes and open cells, like a dense sponge. This structure is hygroscopic, meaning it constantly absorbs and releases moisture from the air. Linseed oil works by filling those microscopic cavities.
The magic is a chemical reaction called polymerization. As you apply the oil, it soaks into these wood cells. Oxygen from the air then reacts with the oil molecules, linking them together into a flexible, solid network right inside the wood’s structure.
This transformation from liquid to solid inside the wood is what makes an oil finish fundamentally different from a surface coating like varnish.
Many people say the oil “dries,” but that’s not quite right. Water-based finishes dry by evaporation. Linseed oil cures through a chemical change. A dry surface can be sticky and soft underneath. A fully cured coat is solid throughout. Rushing this process is the number one reason for a gummy, disappointing finish.
Raw vs. Boiled: The Chemical Difference for Your Finish
Raw linseed oil is just pressed flaxseed oil. It’s pure, food-safe, and used by strict traditionalists. Its polymerization relies solely on oxygen absorption, which is a slow process. A single coat can stay tacky for a week or more, especially when compared to tung oil or polyurethane finishes.
Boiled linseed oil (BLO) is the woodshop staple. Despite the name, it’s not boiled. Metallic salt compounds, called driers, are added to catalyze the polymerization reaction.
In my shop, I use boiled linseed oil for 99% of my oil finishing projects because I need a piece to be usable in days, not months.
This brings a critical safety rule. Oil-soaked rags or paper towels bunched up can generate heat as the oil cures and ignite spontaneously. Always lay rags flat to dry outside, hang them over a metal can, or submerge them in water in a sealed metal container.
Why Metal Driers Make BLO a Practical Shop Choice
The “boiled” label is historical. Today, it means “added driers.” These additives, often cobalt or manganese based, dramatically accelerate curing.
The timeline difference is stark. Raw oil may take 3-5 days to become touch-dry and weeks to fully cure. A coat of BLO is typically dry to the touch in 6-12 hours and ready for recoating or light use in 24-48 hours.
Choose raw oil for historical replication or if you have no time constraints. Choose BLO when you want a traditional oil finish without the impractical wait.
Matching Wood to Oil: What Works and What Doesn’t
Linseed oil performs brilliantly on open-grained hardwoods. These woods have large, visible pores that act like straws, pulling the oil deep into the surface. The results are a warm, deep glow you can feel.
- Oak (white or red)
- Ash
- Walnut (American black walnut is a superb, sustainable choice)
- Mahogany
Proceed with caution on closed-grain woods. Woods like maple, cherry, birch, and poplar have much smaller, tighter pores. Linseed oil can struggle to penetrate, often sitting on the surface where it cures into a soft, sometimes gummy film that attracts dust.
For a durable traditional finish, pair linseed oil with a sustainably harvested, open-pored domestic hardwood like white oak or black walnut instead of a tropical exotic.
Is linseed oil good for all wood? No. It’s a star on porous hardwoods, a poor choice for tight-grained woods, and I would never use it on resinous softwoods like pine for furniture as it can amplify the “sticky” feel of the sap.
The Truth About Linseed Oil Durability
“Durable” means different things for a dining table versus a display cabinet. Linseed oil provides a durable finish for interior pieces that see moderate, careful use think bookshelves, picture frames, or a bedside table.
It creates a soft, warm, and repairable surface, not a hard, bulletproof shell like polyurethane. A polyurethane finish sits on top as a plastic coating. When it fails, you sand it all off. An oil finish wears *in*. A scratch in an oiled surface can often be spot-repaired with a light sanding and a fresh dab of oil.
It is not suitable for bar tops, kitchen tables, or any outdoor application. Water and alcohol will stain it, and sunlight will break it down.
Real durability with linseed oil comes from build. You don’t flood the surface once. You apply 3 to 5 thin coats, allowing each to fully cure before adding the next. This builds a gradual, resilient polymer network within the wood’s top layers, ensuring long-lasting protection.
Non-Negotiable Preparation: Sanding and Cleaning for Success
Linseed oil is a beautiful, honest finish. That honesty is a double-edged sword. It will magnify every scratch, dent, and dust nib you leave behind, making flawless preparation the single most important step. This isn’t a film-forming finish that can hide flaws; it soaks in and highlights the wood’s true surface. Its protective properties have limits: it offers only modest water resistance and may yellow or darken with age. For lasting protection, reapplication and complementary finishes are often required.
How to Sand Wood Before Applying Linseed Oil
Your goal is to create a uniformly smooth, open surface for the oil to penetrate. Start with a methodical progression. For most furniture woods like walnut, cherry, or oak, I follow this sequence: This prep sets the stage for oil finishes wood furniture application. In the next steps, we’ll explore how to apply oil finishes to wood furniture for a smooth, durable finish.
- Begin with 120-grit sandpaper to level the surface and remove any mill marks or deep scratches.
- Move to 150-grit to erase the scratches left by the 120-grit paper.
- Finish with 180-grit or 220-grit to achieve the final smoothness.
For your final pass, always sand by hand, moving strictly with the grain. Power sanders, even orbital sanders, can leave tiny circular scratches that become painfully obvious once the oil darkens the wood. Hand-sanding ensures your scratches are linear and blend with the wood’s natural grain pattern. After sanding, you must remove every speck of dust. I use a shop vacuum with a brush attachment, followed by a stiff-bristle bench brush.
Cleaning Bare Wood: The Last Step Before Oil
After sanding, microscopic dust still clings to the wood pores. Skipping this step seeds your finish with rough grit. First, wipe the entire piece with a commercial tack cloth. Then, take a clean, lint-free cloth (like an old t-shirt), dampen it lightly with odorless mineral spirits, and wipe the wood surface.
The mineral spirits will lift the last of the embedded dust and, crucially, reveal any oils from your hands. If you see dark, blotchy spots where you handled the wood, that’s skin oil. It will repel the linseed oil and create a permanent, uneven finish. If you see this, sand the area lightly and clean again. Let the wood sit for 15-20 minutes to allow all the mineral spirits to evaporate completely before applying oil, as outlined in our surface preparation guide.
The Best Practice Workflow: Applying Linseed Oil Step-by-Step
This is the core of how you apply boiled linseed oil to raw wood. It’s a simple, meditative process that rewards patience. Forget complex techniques; mastery here is about consistency and diligence.
Gathering Your Tools: Brushes, Rags, and Safety Gear
You don’t need fancy tools. You need the right ones. Gather these items:
- Application Tool: A natural bristle brush (like China bristle) or a stack of clean, lint-free cotton rags (old t-shirts are perfect). Natural materials hold and release oil better than synthetics.
- Gloves: Disposable nitrile gloves. Boiled linseed oil contains chemical dryers you don’t want on your skin.
- Rag Disposal: A metal can with a tight-sealing lid, filled with water. Oily rags can spontaneously combust as the oil cures. Place used rags in the can and seal it immediately after use.
For planning, a good rule of thumb for how much linseed oil for wood is 100 ml (about 3.5 oz) per square meter for the first coat on a medium-porous wood like maple. Open-grained oak will use more; dense maple will use less.
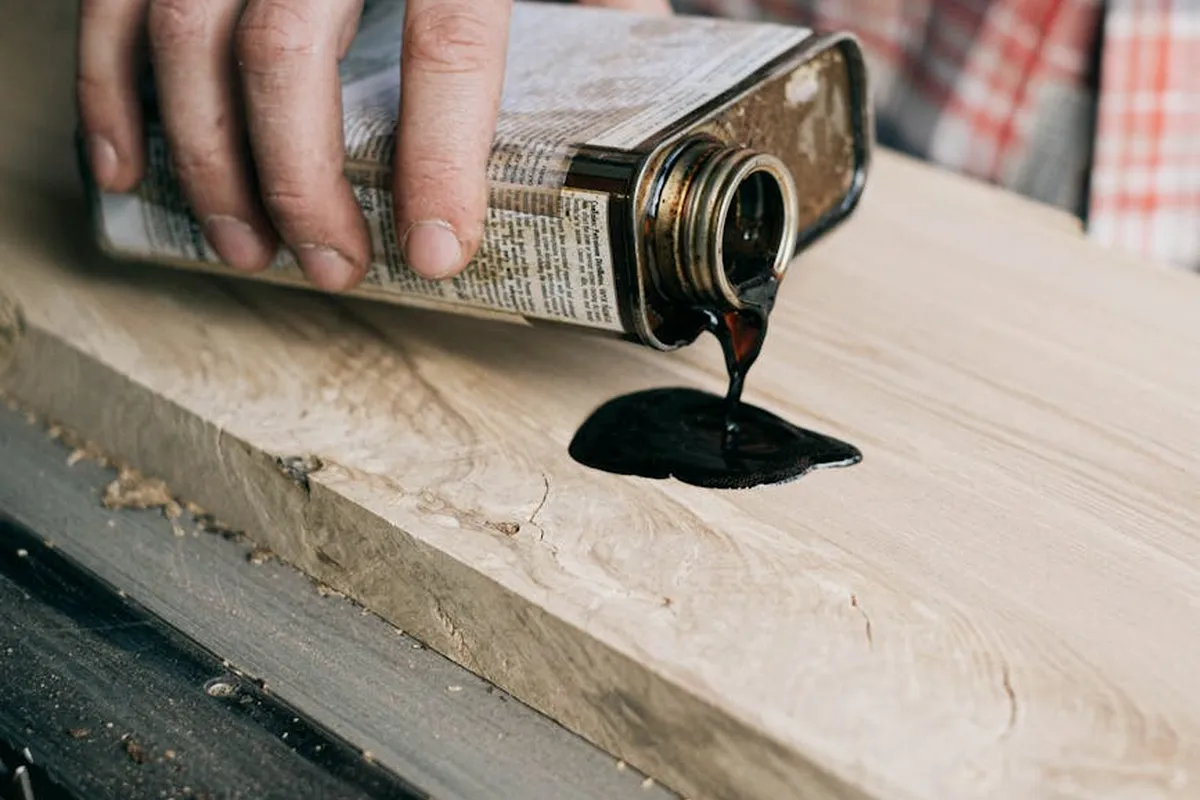
The Application Protocol: Flood, Soak, and Wipe Dry
The universal method is simple: flood the surface, let it soak, then wipe it completely dry. The “wipe dry” part is non-negotiable.
1. Applying the First Coat to Bare Wood
Pour a small pool of oil onto the wood or soak your rag. Work it into the surface, coating it liberally. Use a brush to really work the oil into the end grain, which is thirstier. Ensure every part is wet. Let it soak for 15 to 30 minutes. In warm, dry shops, it may soak in faster. Then, take a fresh, dry rag and wipe the entire surface. Your goal is to leave the wood looking satin and feeling dry, with no visible wet spots. Any oil left on the surface will cure into a sticky, gummy film, not a hard finish.
2. Adding Subsequent Coats for Depth and Protection
Wait until the previous coat is dry to the touch (not tacky). This usually takes 18-24 hours. Before applying the next coat, lightly buff the surface with 0000-grade steel wool or a fine (320-grit) abrasive pad. This “de-nibs” the surface and creates microscopic scratches for the next coat to grip. Apply the second coat the same way, but you’ll notice the wood absorbs less oil, faster. Wipe it dry just as thoroughly.
Most projects reach a point of diminishing returns after 3 or 4 coats, where the wood simply won’t absorb more oil. You’ll know it’s done when you apply oil and it mostly sits on the surface after a few minutes.
3. The Final Cure: Patience is the Last Tool
This is where many go wrong. “Dry to the touch” in a day or two is not “fully cured.” The oil undergoes a chemical polymerization process similar to those found in wood stains and polyurethanes, which take much longer to cure. A linseed oil finish reaches sufficient hardness for light use in about a week, but for full durability, like on a tabletop, allow 2 to 3 weeks. Avoid placing objects on it during this time. To test, press a fingernail into an inconspicuous spot. If it leaves no mark, the finish is cured.
Beyond the Basics: Troubleshooting for a Perfect Finish

A traditional linseed oil finish is simple, but that doesn’t make it foolproof. I’ve learned these fixes through years of practice and by understanding what the oil is doing chemically on the wood. In applying oil finishes, the method you choose—wipe-on, rub-on, or brush-on—matters for even penetration. The next steps will show these application methods in action.
Fixing a Tacky or Gummy Linseed Oil Finish
If your finish feels sticky weeks later, it’s not drying, it’s polymerizing. Linseed oil cures by reacting with oxygen, and that reaction can stall. Three things usually cause this.
First, you applied the coat too thickly. The surface seals, trapping uncured oil beneath it. Second, you didn’t wipe off the excess after 15-20 minutes. That leftover puddle can’t cure properly. Third, you jumped the gun and added another coat before the first one had fully hardened through.
The fix is straightforward: you need to remove the uncured, sticky oil and restart the process. Dampen a clean, lint-free rag with odorless mineral spirits (paint thinner) and wipe down the entire sticky surface. You’re not sanding, just dissolving and removing the gunk. Let it dry completely for a day. Then, apply a new, very thin coat of oil, wipe off all excess thoroughly, and be patient.
Enhancing Durability and Feel: The Buffed Wax Topcoat
Pure linseed oil offers a beautiful, deep glow but limited protection. For a piece that will see use, I always add a traditional paste wax topcoat after the oil cures. This is how furniture was finished for centuries before polyurethane.
Wax doesn’t form a plastic film. It fills the microscopic pores of the cured oil with a harder, crystalline material. This gives you a smoother feel, a warmer sheen, and a slight but meaningful barrier against fingerprints and water spots. The best part is its reversibility; you can buff it off with mineral spirits without harming the oil underneath.
Wait at least a week after your final oil coat. The surface must be fully cured, not just dry to the touch. Apply a thin, even layer of a clear paste wax (like beeswax or carnauba blend) with a cloth. Let it haze over for 5-10 minutes. Then, buff it aggressively with a clean, soft cloth. That friction generates heat, melting the wax crystals into a continuous, smooth layer. I often do a second thin coat for pieces like tabletops.
FAQ: Applying a Durable Linseed Oil Finish
How does the choice between rag and brush application affect oil penetration and finish uniformity?
A brush mechanically agitates oil into deep pores and end grain, ensuring thorough penetration in dense areas. A rag deposits a thinner, more controlled film, minimizing surface residue for uniform curing on open-grained woods.
What role does wood density play in determining the number of coats needed?
High-density woods with limited pore volume absorb oil slowly, requiring more coats to build an internal polymer network. Low-density, porous woods saturate rapidly, often reaching maximum oil uptake in fewer applications.
Why is polymerized linseed oil considered superior for durability, and how is it applied differently?
Polymerized oil undergoes thermal processing to pre-link molecules, yielding a harder, more water-resistant finish that cures faster. Apply it in exceptionally thin coats, as it forms a surface film more readily and requires minimal soak time before wiping.
Can linseed oil finishes be accelerated with heat, and what are the risks?
Moderate heat (e.g., 20-25°C) boosts oxygen diffusion, speeding polymerization, but direct high heat can vaporize volatiles, leading to bubbles or weak cure. Use ambient warming, not directed heat sources, to avoid compromising the chemical reaction.
How do you test for full cure beyond the fingernail test?
Conduct a solvent rub test with mineral spirits on an inconspicuous area; no color transfer indicates complete cross-linking. In shop conditions, monitor for cessation of smell, as residual odor signals ongoing oxidation and softness.
Final Thoughts on Linseed Oil as a Finish
The best application method is the patient one. Wipe on thin, controlled coats and allow each to polymerize fully before adding the next. This builds a durable, traditional finish. Rushing with thick layers creates a surface that stays soft and tacky for months.
Properly finishing a piece is an act of stewardship. Sourcing materials responsibly and maintaining your work ensures it lasts for generations, which is the most sustainable practice in our craft. The science of wood and finishes is deep, and there is always more to learn from each project.
Industry References
- How to Apply Boiled Linseed Oil Properly -Tips & Techniques – PaulsDIY
- Simple Ways to Use Linseed Oil on Wood (with Pictures) – wikiHow
- The ultimate guide to boiled linseed oil
- How to Apply a Linseed Oil & Wax Finish – Lost Art Press
- How to Properly Apply Linseed Oil | DoItYourself.com
- Topic: Finishing with linseed oil – the details? – Woodworking Masterclasses
- How to use Boiled Linseed Oil – YouTube
David is a veteran woodworker. He is now retired and stays in his cabin in Wisconsin which he built himself. David has 25+ years experience working in carpentry and wood shops. He has designed and built many small and large wood projects and knows the science behind wood selection like the back of his hand. He is an expert guide on any questions regarding wood material selection, wood restoration, wood working basics and other types of wood. While his expertise is in woodworking, his knowledge and first hand experience is far from 'woody'.